
“Why is drilling on a pickleball practice wall important?”
Or better yet, “If I can play pickleball games with others and focus on improving my skills during gameplay, do I need to drill on a pickleball practice wall?”
I hear these types of questions a lot. It’s mainly because most beginners don’t want to drill with a partner, let alone a wall because playing recreational games is more fun. However, if you’re serious about improving your pickleball game, I advise you to drill your pickleball hitting techniques just as much as you play.
Why is Drilling in Pickleball Important?
Pickleball is easier to pick up and play compared to tennis, but it’s still really hard to master because the pickleball hitting techniques require precision and ball control. There are many strokes in pickleball that you’d need to hit during a game and, depending on your pickleball skill level, to score a point.
From forehand and backhand groundstrokes to volleys, dinks, and smashes, each stroke may differ in speed, height over the net, spin, and type of grip. So it’s best to get as many repetitions as possible, focusing on the specific shot you want to improve on. The only way to do this is by drilling.
Why Not Drill Your Shots During Gameplay?
While playing practice games teaches you how to play under pressure, you won’t be able to encounter and execute the shots you want to hit repeatedly, let alone often enough for you to master them.
Remember, the more repetitions you get with a specific shot, the quicker you’ll improve. Repetition creates muscle memory which means you’ll be able to hit a specific shot without having to think about it. When you get to this point during gameplay, you can move on to the next shot you’re trying to improve on.
What Are the Benefits of a Pickleball Practice Wall?
Besides the fact that you can drill on a pickleball practice wall to skyrocket your game, there’s a mental, physical, and downright convenient component to using a pickleball wall.
1. Increases Your Physical Endurance.
Pickleball can increase your athleticism and help you burn a ton of calories, whether you’re playing singles or doubles. Each point calls for lunging, quick movement, and bursts of power that can test your physicality, especially in hot conditions. And some games last over an hour, with multiple matches scheduled in a day.
When you’re hitting against a practice wall, there is less time between hits because the ball is traveling at a shorter distance, making the pace of the drill faster. This requires you to stay in a lower athletic stance and move more in between shots.
Needless to say, the more you move and the faster you move, the better workout you’ll get.
2. Amplifies Your Mental Focus.
Because the balls are coming back to you at a faster rate, you need to be locked in and ready to hit the next ball. For some, this can be really challenging, especially at the start. But the longer you practice on a pickleball wall, the easier it’ll be.
3. Maximizes Your Hitting Output.
When you’re drilling with a partner, mistakes happen on both sides. Every time a mistake is made, you have to restart the rally and regain focus. Sometimes, it’s hard to get a lot of repetition when your hitting partner struggles to get the ball over.
Do you know what a pickleball practice wall is great at? Never missing. This is one of the best benefits of practicing against the wall because the better you get at not missing, the more repetitions you’ll get in a shorter time period.
4. Minimizes External Challenges Most Pickleball Players Face.
Pickleball is hotter than the Barbie movie, and it’s been this way for a while. But with that comes the challenge of finding a court to practice and play on. I can recall numerous times when I’d go out to practice and have to leave because all of the courts were taken. Such a bummer.
It’s also challenging to find a partner with the same pickleball skill level to drill with. And even if you have a go-to person, your schedules might not align every single time.
When you have a pickleball practice wall easily accessible, the only schedule you have to worry about is your own and you never have to worry about getting court time.
What Are the Best Pickleball Practice Walls to Consider?
While I can hit on a few practice walls with a net line painted near where I live, most people don’t have access to them. And there are a couple of pickleball-specific training tools that are more beneficial than staking out a wall like I used to do.
Here are two of the top options I’ve found that are solid investments.
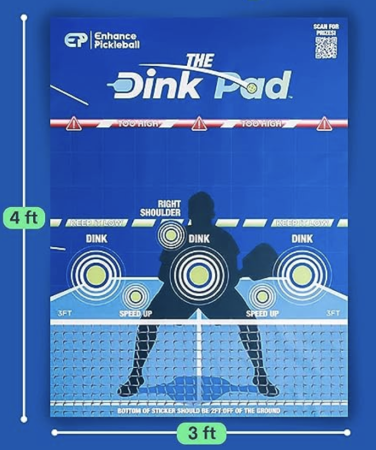
1. The Dink Pad – Pickleball Rebounder
If you’re wanting a hard surface to hit against (remember, a lot of the benefits mentioned above are attributed to hitting against a surface that bounces back quickly), this training tool is the way to go.
Here are some of the perks of the Dink Pad – Pickleball Rebounder.
-
Lightweight, Portable Pad That You Can Stick on a Wall
This pad easily attaches to most indoor or outdoor smooth surfaces. And no need to worry about the weather if you want to practice outside—it’s weather-resistant.
For sturdier, semi-permanent placement, nail the pad to the wall.
-
Complete with Targets on Where to Hit Certain Shots and Includes a Shadow of Your Opponent
One of my favorite features is the targets on the pickleball pad. It shows you where to hit a speed-up ball, how high over the net you should dink, and where to aim for when you’re straight ahead of your opponent.
This adds another element to your pickleball drilling that can accelerate your improvement.
-
Best Bang for Your Buck
You can get this pickleball pad for under $100! That’s less than most pickleball pads on the market. If you want an affordable training tool, I definitely recommend going with this one.
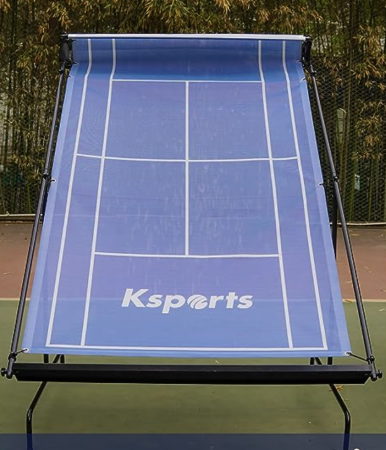
2. Ksports Racquet Sports Rebounder for Pickleball
If you’re wanting more time in between hits while still maximizing repetitions during your drills, check out the Ksports Racquet Sports Rebounder. This tool is best for beginners because you’ll have time to set up each shot, rather than feeling rushed to hit the next shot like you’d experience while hitting on a hard surface.
Here are some of the perks of the Ksports Rebounder.
-
Portable, Easy to Set Up, and Easy to Take Down
No walls in sight? No problem! All you need is an open area to set this bad boy up, and you can immediately start drilling.
This portable pickleball practice wall takes less than 10 minutes to set up, which means less time preparing for your practice and more time actually drilling. When you’re done, simply store it in a case with a strap to pull across your body for seamless portability.
-
Unique Design That Allows Time to Focus on Technique
When you hit the ball on the tarp, it slides down the wall and bounces up when it hits the bottom, allowing you to hit another ball on the tarp.
This feature is ideal for focusing on technique because it slows down the pace between shots, so you can take your time setting up for the next shot.
-
Adjust the Height to Hit Low and High Balls
During gameplay, you’ll get a variety of shots coming your way, and at different heights. Each shot requires you to adjust your footwork accordingly, and this tool can help foster that footwork.
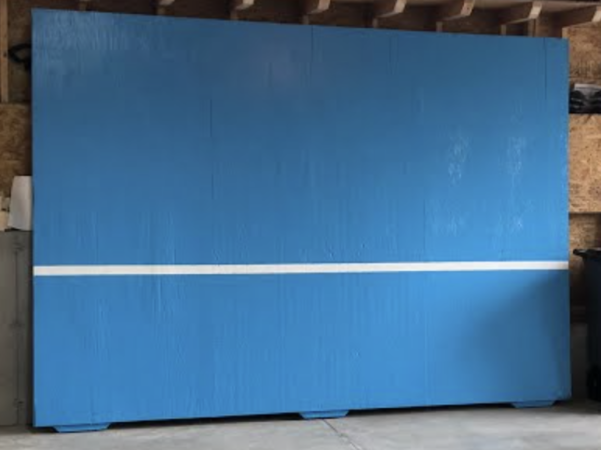
How to Make Your Own Pickleball Practice Wall
Up for a pickleball project that can pay dividends in the long run? Make your own pickleball practice wall following the instructions below.
1. Choose Your Location.
Pick an area with enough space to move around freely and swing. A standard pickleball practice wall would be about eight feet wide by twelve feet high. A backyard would be an ideal spot for a pickleball practice wall.
2. Prepare the Plywood Sheet.
Plywood is the material you’ll be using for your wall. Cut two sheets of plywood with the dimensions eight feet wide by twelve feet high using a circular saw.
3. Build the Frame.
Next, you’ll need to cut the metal posts to create a study frame to support the plywood. Cut the posts so that they’re a little over twelve feet high, or a little taller than your plywood sheet. Then, dig holes to anchor the posts to the ground.
4. Attach the Plywood to the Frame.
Now that your posts are secure and level in the ground, attach the plywood sheets to the frame using screws. If the plywood becomes wobbly during play, simply tighten the screws.
5. Start Drilling.
Stand about six feet away from the wall to drill groundstrokes, serves, and dinks. Move closer to master your volleys and blocks.
In Closing…
There are many pickleball practice wall options that give you the ability to get better quickly. Even hitting on the wall for 30 minutes a day can propel your game.
The more you drill, the more confident you will be with your shots. Take the skills you’ve learned through drilling and play practice games also to implement them in real matches. I noticed that my game progressed quicker when I spent 50 percent of my time drilling and 50 percent playing practice games.
You need both to succeed. Happy drilling!