
Pickleball is one of the most enjoyable games for all kinds of players. Whether you’re old, physically inept at sports, or just someone looking for an easy sport you can play with friends—pickleball is for everyone.
However, you might be hesitant to drop $20 to $40 for a good starter paddle. These are even much cheaper than the higher-end paddles which can cost $50 to $100 each.
So, what about a DIY pickleball paddle? Can you really make one yourself? Will it be good enough? Well, that’s what we’re here for. Because the good news is—yes, you can make a DIY pickleball paddle.
What Is a Pickleball Paddle?
Let’s start by going over everything there is to know about a pickleball paddle.
Pickleball is a sport played with a paddle, kind of like ping pong or table tennis. The paddle is much bigger than a ping pong paddle but smaller than a tennis racquet.
| Pickleball Paddle — Specs | |
|---|---|
| Dimensions |
|
| Construction Materials | Carbon Fiber, Graphite, Composite, Fiberglass, Wood (What’s the best material for a pickleball paddle?) |
| Function | A pickleball paddle should:
|
| Durability | Typically lasts 8 to 18 months for a regular or hobbyist. (How long do pickleball paddles last?) |
| Price Range | $25 to $120+ |
There are other characteristics of a pickleball paddle that can’t easily be seen from the specs sheet. Characteristics like the weight distribution of the paddle, grippiness or feel of the grip, and the personal comfort of how it feels in your hand during games.
How to Make a DIY Pickleball Paddle
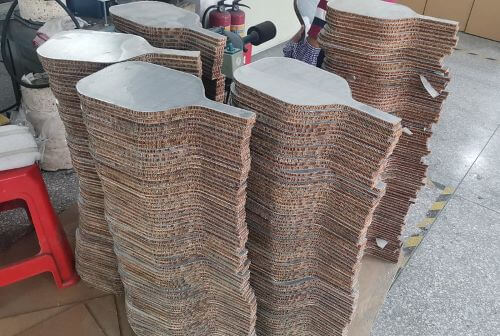
Making your own DIY pickleball paddle is actually quite common. In fact, wooden paddles were still the norm back in the 1980s to 1990s, before composite, fiberglass, and graphite materials were introduced to the market.
Not surprisingly, a DIY pickleball paddle won’t be as good as the paddles for sale. It will have subpar quality, be much heavier, less durable, not tournament-legal, and have more downsides. But it’s good enough for beginners who just want to try out the sport.
If you’re considering the DIY approach, we recommend finding a pickleball court you can rent out and checking if they have paddles you can use. Playing a few pickleball games there will let you know if the sport is for you or not. If you find yourself enjoying the game, then you can decide whether to buy your own paddle or make a new one from scratch.
If you decide to make your own pickleball paddle, here are the two best ways to do it:
3D Printing a Pickleball Paddle
The most common DIY method for creating a pickleball paddle is to use wood. However, 3D printing your own paddle is actually a great alternative, especially since 3D printing has become a cheap, commercial hobby for a lot of people.
You can find a couple of pickleball paddles on Thingiverse that you can just collect and then print. Here’s one of our favorites:
Pickleball Paddle MK2 by Ryborg01
The Pickleball Paddle MK2 is the 2nd design of user Ryborg01 for creating a pickleball paddle. It’s modeled after a $90 paddle with some slight modifications, such as there being no edge guard. The paddle meets official tournament regulations too, so the dimensions and weight are up to standard.
You’ll find some notes and some post-printing steps by the user if you scroll down the Thingiverse page. Ryborg01 suggests that you sand the paddle to smoothen out the surface after joining the handle to the body with some epoxy. After that, simply paint and add grip tape to finalize your paddle!
If you don’t have a 3D printer, try looking for a 3D printing group around your local area. These groups of enthusiasts are usually happy to 3D print an object for you as long as you pay for the filament and perhaps a little extra. Trust that the cost won’t be anywhere near buying a proper pickleball paddle, so you’ll still be saving some cash!
DIY Wooden Pickleball Paddle
A wooden pickleball paddle is the standard solution for all DIY paddle projects. It’s easy to do if you know your way around some tools and if you have the slightest experience with woodworking. If not, don’t worry—it’s quite easy for complete beginners to pick up.
Materials You’ll Need
To make a DIY wooden pickleball paddle, you will need the following materials:

- Wood: Choose a piece of wood suitable for paddle making, such as plywood or another type of hardwood.
- Template: You can find a template online or create your own design for the paddle shape.
- Cutting tool: You will need a saw or a jigsaw to cut out the paddle shape from the wood.
- Sandpaper: Use sandpaper of various grits to smoothen and refine the surface and handle of the paddle.
- Varnish or polyurethane: Applying a finish will protect and enhance the appearance of the paddle.
- Handle material: You can use additional wood or foam to create the handle portion of the paddle.
- Grip material: Choose a grip material that provides comfort and enhances your grip on the paddle, such as rubber or tennis grip tape.
- Clamp: A clamp will assist you in the gluing process when you need to maintain a constant force between the handle and the paddle face.
- Wood Glue: This is the best adhesive to use for this situation, because of how strong it is at bonding wood when it’s fully dried.
The time it takes to make a DIY wooden pickleball paddle will vary depending on your woodworking skills and the complexity of the design. Generally, the process can be completed within a few hours or over the course of a day.
How to Make DIY Wooden Pickleball Paddle
Here is a step-by-step process to follow in making your DIY wooden pickleball paddle, incorporating information from the provided references:
-
Choose a Design
Select a paddle design or template that suits your preferences and playing style.
Consider factors such as paddle dimensions, shape, and handle type. You can find paddle designs and templates online through various pickleball resources, forums, or websites dedicated to paddle customization.
You can also explore paddle designs from established manufacturers for inspiration.
-
Choose Your Material
Plywood or some kind of hardwood is the recommended material for DIY pickleball paddles. They’re easy to shape and cut through while still being durable and stiff enough to play pickleball with. You can purchase these kinds of wood from local hardware stores, specialty woodworking stores, or online suppliers.
- Look for plywood or hardwood options that are smooth, sturdy, and thick enough for your paddle.
- Popular wood choices for pickleball paddles include Baltic birch plywood, maple, or poplar. Baltic birch plywood is often recommended for its stability and durability.
Consider the availability, affordability, and workability of the wood when making your choice. Plywood is commonly used for DIY projects due to its accessibility, but it isn’t the most durable or stiff choice. You might end up with a weak paddle.
The wood should be rigid and non-compressible, according to International Federation of Pickleball (IFP) guidelines.
-
Use the Design and Cut Your Paddle
Transfer your chosen template onto the wood of your choice using a pencil, or by attaching the template directly.
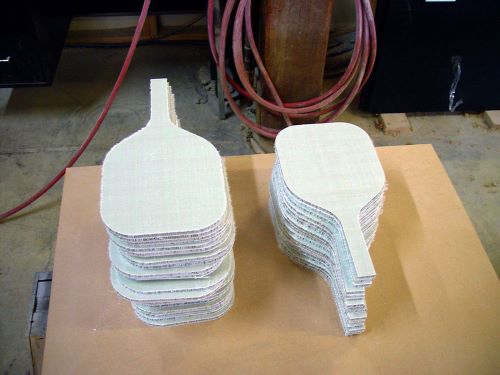
We recommend gluing the template onto the wood before you start. That way, the template won’t move as you’re cutting it. Carefully cut out the paddle shape from the wood using a saw or jigsaw.
When cutting the paddle shape from the wood, it is generally advisable to cut slightly outside the marked lines. You don’t want to risk cutting it too small that it becomes unusable. It’ll be easier to cut it bigger and then remove excess material during the sanding process to make sure the final shape matches the desired dimensions accurately.
-
Create the Handle
The handle on your paddle should be bulkier than the face, to make it easier and more comfortable for your hand. There are different ways to go about doing this.
- Cut two identical pieces with the same dimension as your paddle handle. Stick those two pieces to either side and then sand them down later into a comfortable, cylindrical shape.
- Another way is to have the handle and paddle face completely separate, and then attach the bigger handle to the paddle face with some kind of epoxy.
You can also buy handles or grips that will attach to your paddle, but finding the right fit might be a problem. Commercial grips are designed to fit the standard pickleball paddle, which already has a girthier handle area.
-
Sand and Finish the Paddle
Once you’re done cutting out your template and handle, it’s time to sand the wood and make it smoother for playing and holding.
Start sanding with medium-grit sandpaper (around 120 to 150 grit) to remove rough edges and imperfections left from the cutting process. Gradually progress to finer-grit sandpaper (such as 220 to 320 grit) for a smooth and polished surface.
By the end of this step, the paddle should feel smooth to the touch without any noticeable roughness or splinters.
-
Assemble Your Pieces with Some Wood Glue
To securely attach the handle to the paddle face, you will need wood glue. Wood glue seeps into the wood, kind of like tree roots to the ground, creating a strong bond between the wood surfaces. It’s the best kind of glue for this DIY project.
Choose a high-quality wood glue that is suitable for bonding wood and dries clear. Titebond Original Wood Glue is a popular choice among woodworkers. Once you have your materials, do the following:
- Apply a thin, even layer of wood glue to both the surface of the handle and the area where it will be attached to the main paddle body.
- Press the handle firmly onto the designated area, ensuring proper alignment.
- Remove any excess glue that squeezes out using a damp cloth or sponge.
- Clamp the handle to the main paddle body using clamps, or apply pressure by placing heavy objects on top. This ensures a strong and tight bond.
Follow the manufacturer’s instructions for drying and curing times. It is recommended to let the glue dry for at least 24 hours to ensure a solid bond.
-
Final Touches
Inspect the paddle for any rough edges, splinters, or imperfections, and sand them down if necessary to ensure a smooth and safe playing surface.
You can also add personal touches, such as logos, designs, or decorative elements using paint or stenciling techniques. While doing so, always consider the regulations and guidelines regarding surface textures.
Once you’re happy with how the wood looks and feels to you, we recommend varnishing and polishing the wood with multiple layers to make it look and feel even better.
-
Enjoy
With the paddle complete, you can go ahead and enjoy playing pickleball with your new DIY paddle.
Remember to follow the guidelines and regulations provided in the references to ensure your DIY wooden pickleball paddle is safe, functional, and compliant with standards.